If anyone is interested in my experiments with a watchdog and control of a Ryde using an Arduino and I2C here is the latest results.
The first thing to mention is the odd way the buster lite software does not like the smbus. Infact it has caused me days of head banging until I saw one little mention of that in a group discussion. So for this project to work the version of buster loaded onto the sd card was Raspberry Pi OS with desktop
https://downloads.raspberrypi.org/raspi ... -armhf.zip
This was put onto the sd card and the file ssh. added.
Once the sd card was in the RPi4 and the software loaded I used putty to ssh into the RPi and using sudo raspi-config setup the I2C and VNC interfaces.
Using VNC I then had the rpi desktop on my computer.
Using the command prompt from the desktop (via VNC) I installed the Ryde receiver software as you normally would have using the Ryde instructions
wget
https://raw.githubusercontent.com/Briti ... ll_ryde.sh
chmod +x install_ryde.sh
./install_ryde.sh
Once the software has loaded the Ryde receiver should work in the expected way BUT smbus will now work in the modified playback.py file.
The simple program for the Arduino to flash the LED :
/*
Arduino Slave for Raspberry Pi Master
i2c_slave_ard.ino
Connects to Raspberry Pi via I2C
DroneBot Workshop 2019
https://dronebotworkshop.com
*/
// Include the Wire library for I2C
#include <Wire.h>
// LED on pin 13
const int ledPin = 13;
void setup() {
// Join I2C bus as slave with address 8
Wire.begin(0x8);
// Call receiveEvent when data received
Wire.onReceive(receiveEvent);
// Setup pin 13 as output and turn LED off
pinMode(ledPin, OUTPUT);
digitalWrite(ledPin, LOW);
}
// Function that executes whenever data is received from master
void receiveEvent(int howMany) {
while (Wire.available()) { // loop through all but the last
char c = Wire.read(); // receive byte as a character
digitalWrite(ledPin, c);
}
}
void loop() {
delay(100);
}
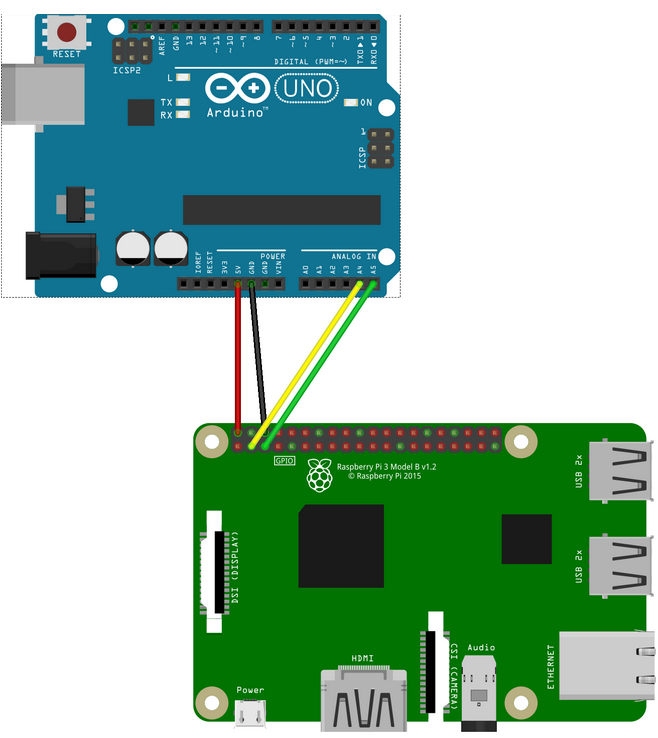
So to make the Arduino LED come on when 'Longmynd not Loaded' crash happens it hasto be connected to the RPi as in the diagram:

- RPi to Arduino.png (166.08 KiB) Viewed 2890 times
Now to find the player.py code to modify use putty to login to the RPi and type:
cd /home/pi/ryde/rydeplayer/states/
nano playback.py
you could save a copy of the original playback.py called playbackoriginal.py before continuing.
You can now exit nano and start a new nano by typing
nano
This will give you a new blank file where you can cut and paste:
# Ryde Player provides a on screen interface and video player for Longmynd c$
# Copyright © 2020 Tim Clark
#
# This program is free software: you can redistribute it and/or modify
# it under the terms of the GNU General Public License as published by
# the Free Software Foundation, either version 3 of the License, or
# (at your option) any later version.
#
# This program is distributed in the hope that it will be useful,
# but WITHOUT ANY WARRANTY; without even the implied warranty of
# MERCHANTABILITY or FITNESS FOR A PARTICULAR PURPOSE. See the
# GNU General Public License for more details.
#
# You should have received a copy of the GNU General Public License
# along with this program. If not, see <
https://www.gnu.org/licenses/>.
import pydispmanx, pygame, enum
from smbus import SMBus
from time import sleep # Import the sleep function from the time module
addr = 0x8 # bus address
bus = SMBus(1) # indicates /dev/ic2-1
class States(enum.Enum):
PLAYING = enum.auto()
LOCKED = enum.auto()
NOLOCK = enum.auto()
NOLONGMYND = enum.auto()
# manager for full screen plyback state messages
class StateDisplay(object):
def __init__(self, theme):
self.theme = theme
self.state = None
# setup display layers for behind and infront of the video layer
self.frontDispmanxlayer = pydispmanx.dispmanxLayer(2)
self.backDispmanxlayer = pydispmanx.dispmanxLayer(0)
self.frontSurface = pygame.image.frombuffer(self.frontDispmanxlayer, se$
self.backSurface = pygame.image.frombuffer(self.backDispmanxlayer, self$
self.setState(States.NOLONGMYND)
self.frontDispmanxlayer.updateLayer()
bus.write_byte(addr, 0x0) # switch it off
# redraw a fullscreen display with a multiline message over it
def drawMessage(self, displayText, surface):
lineSurfaces = []
# work out how wide the lines are and prep their surfaces
maxLineWidth = 0;
for line in displayText.split("\n"):
lineSurface=self.theme.fonts.playStateTitle.render(line, True, self$
maxLineWidth = max(maxLineWidth, lineSurface.get_width())
lineSurfaces.append(lineSurface)
textSurface = pygame.Surface((maxLineWidth, self.theme.fonts.playStateT$
starty = 0;
# draw the surfaces
for lineSurface in lineSurfaces:
linesurfacerect = lineSurface.get_rect()
linesurfacerect.centerx = textSurface.get_width()/2
linesurfacerect.top = starty
starty += self.theme.fonts.playStateTitle.get_linesize()
textSurface.blit(lineSurface, linesurfacerect)
textsurfacerect = textSurface.get_rect()
textsurfacerect.center=surface.get_rect().center
surface.blit(textSurface, textsurfacerect)
# update the state and redraw the message if required
def setState(self, newState):
if(newState != self.state):
self.state = newState
if(newState == States.LOCKED):
self.backSurface.fill(self.theme.colours.backgroundPlayState)
self.drawMessage("Locked\nNo Video", self.backSurface)
self.backDispmanxlayer.updateLayer()
self.frontSurface.fill(self.theme.colours.transparent)
else:
self.frontSurface.fill(self.theme.colours.backgroundPlayState)
displayText = "ERROR\nNOT FOUND"
if(newState == States.NOLONGMYND):
bus.write_byte(addr, 0x1) # switch it on
displayText = "LongMynd\nNot Loaded"
elif(newState == States.NOLOCK):
displayText = "1316MHz RX\n333k 1M 2M SR"
self.drawMessage(displayText, self.frontSurface)
self.frontDispmanxlayer.updateLayer()
return True
else:
return False
def __del__(self):
del(self.frontSurface)
del(self.backSurface)
del(self.frontDispmanxlayer)
del(self.backDispmanxlayer)
Save this new file as playback.py and overwrite the old file.
If you have the Arduino and a minituoiner connected you should be able to reboot the RPI using
menu
and selecting reboot.
The RPi should reboot and just as it gets going it will go through 'Longmynd not Loaded' and flash the LED of the arduino then work as normal. If the minituoiner is disconnected the LED will stay on.
If you get this far well done!
Next is the software for the Arduino to reset the RPi should the crash condition happen and also a shutdown if the volts are low or even if it overheats?
Martin G8LCE